Showing posts with label fabric. Show all posts

Sunday, January 19, 2014

Fabric Collar - Do It!

Sewing Kantha Fabric Collars with Santina Cessor
Pin It
This week's DIY post was by Santina Cessor, the talent behind the Threads, a blog about sewing and fashion. Santina only started sewing about a year ago, but she was a quick learner and started doing custom alterations on vintage clothes for friends and clients. I asked Santina to take some of the scrap fabric I've been collecting and make us something easy and useful. Keep reading for a step-by-step how-to of how to make a fabric collar. Santina chose to work with one of our vintage kanthas.

DIY Fabric Collar
by Santina Cessor

A simple accessory can update any outfit. You might pile on bracelets, earrings, necklaces or even a scarf, but have you thought about adding collar? Collars, Peter Pan collars in particular,  have been a fun fashion trend we've seen everywhere – high-end runway looks, ready-to-wear-fashion, DIY.

Creating your own collar is simple and can be completed with just a few tools.

Tools

  • Cutting Board
  • Scissors or Rotary Cutter
  • Paper
  • ½ Yard fabric
  • Thread (matching or contrast)
  • Ribbon

Sewing Kantha Fabric Collars with Santina Cessor-3

1. Create your collar pattern on paper similar to the one above. Be sure to measure your neck to confirm the curve is large enough. Click here for a free printable pattern by Sewing Like Mad.

2. Fold fabric in half and place pattern atop it along the fold. Then pin in place.

3. Carefully cut fabric along the pattern. Repeat step 2 & 3. You should end up with two pieces.

Sewing Kantha Fabric Collars with Santina Cessor-4
4.  Place pieces right side together and pin.

5. Set up your sewing machine for straight stitch, or thread your needle for hand stitching. You’ll need a standard foot and edge foot.

Sewing Kantha Fabric Collars with Santina Cessor-5
Sewing Kantha Fabric Collars with Santina Cessor-6
Sewing Kantha Fabric Collars with Santina Cessor-7
Sewing Kantha Fabric Collars with Santina Cessor-8
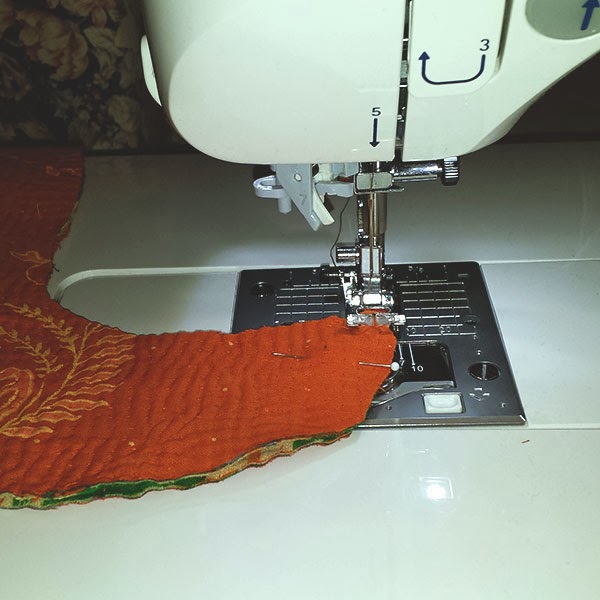
6. Sew along the curves end to end leaving a ¼” seam allowance. When finished turn fabric right side out and iron.

7. On the open end gather ¼” on each side and fold over towards each other, then pin in place. Sew along the edge with edge foot and leave 1”on each end.

8. Push ribbon into 1” opening then fold ¼” seams toward ribbon, pin together. Fold ribbon to the back and stitch together.

Sewing Kantha Fabric Collars with Santina Cessor-9

The nice thing about collars is that you can quickly change your look by switching out the ribbon. Change the color palette and slip in a hot pink or black ribbon. Add some texture by trying lace. Swap in a luxurious silk ribbon. Or pin it demurely with a jeweled brooch. The collar offers many, many different looks that can change just about any outfit.

Have fun trying out this new look and we'd love to see what YOU come up with. Also, in case you missed it, see our gift bag DIY with #fabricscraps right here.

Wednesday, October 23, 2013

Bag It Up

Pin It

Several of The Loaded Trunk textiles go through transformations before they arrive in the shop. Blankets and wall hangings turn into pillows. Throws become table runners. The fabrics are just so beautiful I hate to see them only live one life. A side result from these projects is tons of fabric scrap. With the holidays just around the corner, I decided to dust off my sewing machine and turn those scraps into drawstring bags. They're perfect for just about anything and the bag is almost a gift in itself.

Even though it's been months, maybe years, since I last touched my machine (I actually had to clean an embarrassing amount of dust off it), it did kind of feel like riding a bicycle. Frustrating until your brain starts clicking and things fall into place again. I used this tutorial as a refresher and this one is good too.

Although I know this isn't the right way to do it, I didn't really measure. Depending on the fabric scrap, I just made sure to give myself enough room for the drawstring at the top of the bag. The little one on the end I modified to create a flap since the pattern begged for it and added a snap enclosure.


The blue bag was large enough to hold two bottles (perfect for wines, vinegars, etc). It measures 9-inches wide by 16-inches high. The medium-sized bag holds one bottle and measures 5.5-inches wide by 12.5-inches high. These are both final sizes. Just add about a half inch to these measurements for the inseam. I just strung simple twine through top, but you can jazz it up with ribbon if you have it.


My favorite of the three bags is this little tiny one. It's the perfect size for a wine key and stopper or a bar of deliciously scented soap.


Stay tuned for more projects featuring these scrap fabrics!